Note: This document describes the Moviemaking feature as it was in release R9.25. If you're using a release other than R9.25, please either update this manual, or LART Megagun to complete the new version of this manual.
One of the new features added in release R9.25, is the ability for users to make a movie of their actions while they're on the surface. Surface only, as of now, but that might change someday. To access the Moviemaker, hit F4 while on the surface of a planet.
The Moviemaker is a simple utility that really does nothing more than taking a snapshot at a constant rate. For example, the user can take a snapshot every 5 in-game frames. Since we do not know if Felysians suffer from epilepsy, you'll be able to kill the black flash that you'll see whenever you take a snapshot. To actually turn a recorded movie into a .avi file, you'll need a utility that allows you to do that. My (that's me, Megagun) original intention was to make a .bat file for easy (yet unadvanced) NoctisMovie to Avi conversion, but I haven't gotten a reply yet from authors of such image to avi applications (hey, I need permission, right). Therefore, I recommend to you all to use the excellent and freeImageToAvi tool, made by ASW software, which you can get here.
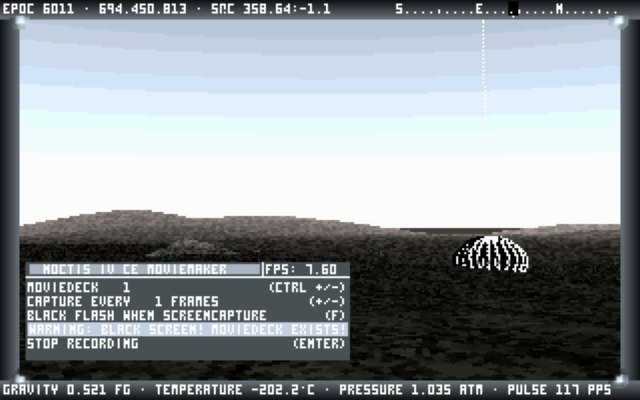
Now, you'll probably be wondering what the Moviemaker actually looks like, eh? Well, here it is:
As you can hopefully see, the moviemaker is in this case already running. I'll describe to you what each and every thing does. "NOCTIS IV CE MOVIEMAKER" - Shame on you if you don't know what that does! One little note though: the background of this text will brighten a bit whenever you're recording. "FPS: ##.##" - Shows the average Frames Per Second rate of the movie so-far you've recorded it. If you want to turn your movie into an .avi file, inputting the number next to "FPS:" as the .avi's FPS rate, you'll have a perfect 1-ingame-second-every-real-second movie. The FPS rate will only show whenever you're recording a movie. "MOVIEDECK ### (CTRL +/-)" - This displays the current Moviedeck used. A Moviedeck is nothing more than a specific folder named after the moviedeck's number. If the moviedeck's number is 1, the folder it'll record to is named "001". If the number is 604, the folder it'll record to is named "604". You can find the moviedecks in your "Noctis\Movies" folder. You can change Moviedeck by holding Control and the + or - keys. The Moviedeck number will be 1 every time you start up Noctis. "CAPTURE EVERY ### FRAMES (+/-)" - This shows how (or actually: when) frames will be captured. If this is 1, every frame will be captured (capture,capture,capture,capture). If this is 2, every 2nd frame will be captured (capture,nocapture,capture,nocapture). If this is 3, every 3rd frame will be captured (capture,nocapture,nocapture,nocapture,capture). Change this number by pressing the + or - keys. This will be 1 every time you start up Noctis, and if you want a realtime (read: not timelapsed) movie, keep this at 1. "NO FLASH WHEN SCREENCAPTURE / BLACK FLASH WHEN SCREENCAPTURE (F)" - This shows whether a black flash will be there when a frame is captured, or not. It's recommended to NOT have a black flash, since those black flashes can be quite irritating. Besides, a bright or dark line at the bottom of the screen will already signal you whenever a frame is captured. However, on old PCs, having a black flash MIGHT speedup the game. Use as your own risk, though. Toggle by pressing the F key. "WARNING: BLACK SCREEN! / MOVIEDECK EXISTS!" - This shows you the warning signals. If this doesn't show up, you're ready to capture a movie without any complications, however, if this DOES show up, you should reconcider what you're doing. "BLACK SCREEN!" means that you've got both the black flash enabled, AND you're capturing every frame. This results in a screen that will remain black for the entire time you're capturing a movie. "MOVIEDECK EXISTS!" means that a moviedeck is already being used by a different movie. You can still overwrite the old movie, but this can result in a moviedeck containing one movie, and part of another. Imagine you've captured a 100 frame movie, and now you're capturing a 50 frame movie over it. This will mean that in the current moviedeck selected, you'll have two halves of a movie, and it'll be 100 frames total in length. So generally speaking, you should never ever capture a movie on a preexisting moviedeck! "START RECORDING / STOP RECORDING (ENTER)" - This is just a text that tells you how to start or stop recording a movie. Just hit ENTER and you'll be capturing your very own movie. Now just hope that those actors will do whatever YOU want them to do.. As every director knows, animals are hard to handle with... Note that as soon as you hit enter, the Moviemaker window will close. You can only start recording when the Moviemaker window is open, but stopping recording always works, even when the Moviemaker window is closed.
So, now you know how to record a movie using the Moviemaker, but you still don't know how to actually turn a movie into an .avi.. Therefore, what follows is a simple step-to-step guide on how to do that using the excellent ImageToAvi tool.
1) hit Add Image Files.
2) navigate to your noctis\movies\MOVIEDECKNUMBER folder, where MOVIEDECKNUMBER is -ofcourse- the number of the moviedeck you want to record, such as "001"..
3) Select all files (ctrl A) and hit OK.
4) Hit OK again for the "# files added to list".
5) set Width to 320, set Height to 200, set Border Size Width to 0, and set Border Size Height to 0, too...
6) change Frames Per Second to the Frames Per Second you want your movie to have (preferably the same FPS rate as you have seen while recording the movie).
7) Hit Output File and change the location, if you so prefer.
8) Hit Compile Images, pick a codec and configure it (I'd pick Xvid or Microsoft Video 1), and sit back and relax.
9) Compress the resulting .avi file (Microsoft Video usually compresses to about 50% of it's original size!), and put it online somewhere! :)
Note that the compression rate depends on the movie. A lot of detail (read: Felysian grass, for example) means larger filesize, OR worse quality.
Experiment a bit until you get the desired result...